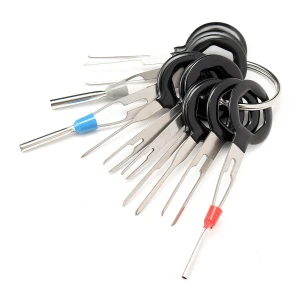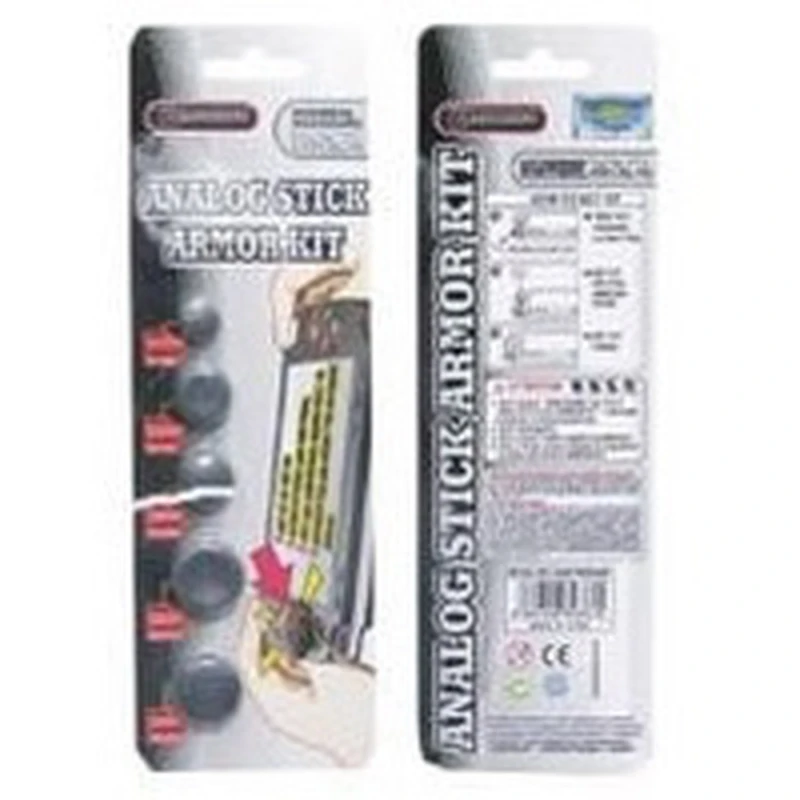
PSP Analog Stick Armor Kit zur Reparatur des PSP-Analogsticks – 5er-Pack
Marke: satkit
Inkl. MwSt. (Exkl. MwSt.: 2,50€)
Das PSP Analog Stick Armor Kit ist ein Ersatzteilset zur Reparatur des Analogsticks von PSP-Konsolen, einschließlich der Modelle PSP Slim, PSP 3000 und PSP Go. Dieses Kit ist ideal für Nutzer, die die Funktion des Analogsticks ihrer Konsole effizient und einfach wiederherstellen möchten.
Hauptmerkmale:
- Ersetzt den originalen Analogstick der PSP, um Präzision und Reaktionsverhalten zu verbessern.
- Pack mit 5 Einheiten, bietet mehrere Ersatzteile für zukünftige Reparaturen.
- Einfache Installation, ideal für Nutzer, die Reparaturen selbst durchführen.
- Kompatibel mit den Modellen PSP Slim, PSP 3000 und PSP Go.
- Produkt der Marke satkit, bekannt für Zubehör und Ersatzteile für Konsolen.
Technische Daten:
- Menge: 5 Einheiten pro Box.
- Funktion: direkter Ersatz des originalen Analogsticks.
- Empfohlene Verwendung: Reparatur und Wartung von PSP-Analogsticks.
Typische Anwendungen:
- Reparatur des Analogsticks, wenn er Fehler aufweist oder nicht richtig reagiert.
- Verbesserung des Spielerlebnisses durch Wiederherstellung der Präzision des Controllers.
- Vorbeugende Wartung, um zukünftige Probleme mit dem Analogstick zu vermeiden.
Kompatibilität:
Dieses Kit ist kompatibel mit den Sony PSP Slim, PSP 3000 und PSP Go Konsolen und gewährleistet eine perfekte Passform sowie optimale Funktionalität.
Hinweis: Dieses Produkt ist derzeit nicht auf Lager, aber du kannst Alternativen prüfen oder uns für weitere Informationen kontaktieren.
- Ersetzt den originalen PSP-Analogstick
- 5er-Pack für mehrere Reparaturen
- Einfach zu verwenden und zu installieren
- Kompatibel mit PSP Slim, PSP 3000 und PSP Go
- Produkt der Marke satkit
Kundenfragen & Antworten
Quins materials componen els sticks inclosos al kit i com afecta això la durabilitat?
Els sticks estan fabricats principalment en plàstic ABS reforçat i tenen un recobriment superficial de goma per millorar l’adherència. L’ABS ofereix bona resistència mecànica, tot i que es pot desgastar amb un ús intensiu; no iguala la longevitat dels sticks originals de Sony.
Quines eines o passos calen per instal·lar correctament un stick d’aquest kit?
La instal·lació requereix un tornavís de precisió tipus Phillips #00, unes pinces fines i netejar superficialment els contactes abans del muntatge. El procés implica desmuntar la carcassa, retirar l’stick danyat i col·locar el nou assegurant els connectors, cosa que normalment triga 10–20 minuts.
Quins són els problemes més freqüents després de substituir l’stick i com es poden solucionar?
Les incidències més comunes després de la substitució són manca de resposta, moviments erràtics o calibratge incorrecte. Habitualment, això es deu a un mal ajust del connector o a brutícia. Tornar a instal·lar l’stick assegurant el contacte i netejar la zona sol resoldre-ho; si persisteix, cal verificar la compatibilitat.
Què diferencia aquest kit respecte als sticks OEM en termes de rendiment i garantia?
En comparació amb els sticks OEM (Original Equipment Manufacturer), aquest kit pot oferir una sensació de desplaçament lleugerament diferent i una durabilitat menor amb un ús intensiu. Generalment no inclou garantia oficial, només la del venedor; es recomana per a reparacions econòmiques més que no pas per a restauracions premium.
What materials are the sticks in the kit made from, and how does this affect durability?
The sticks are mainly made from reinforced ABS plastic and have a rubber surface coating to improve grip. ABS offers good mechanical strength, although it can wear with heavy use; it does not match the longevity of original Sony sticks.
What tools or steps are needed to install a stick from this kit correctly?
Installation requires a Phillips #00 precision screwdriver, fine tweezers and a light clean of the contacts before assembly. The process involves disassembling the casing, removing the damaged stick and fitting the new one while securing the connectors, which typically takes 10–20 minutes.
What are the most common issues after replacing the stick and how can they be fixed?
The most common issues after replacement are no response, erratic movement or incorrect calibration. This is usually due to a poorly seated connector or dirt. Reinstalling the stick to ensure proper contact and cleaning the area usually resolves it; if the problem persists, check compatibility.
What sets this kit apart from OEM sticks in terms of performance and warranty?
Compared with OEM (Original Equipment Manufacturer) sticks, this kit may offer a slightly different feel and lower durability under heavy use. It generally does not include an official warranty, only the seller’s warranty; it is recommended for budget repairs rather than premium restorations.
What materials are the sticks in the kit made from, and how does this affect durability?
The sticks are mainly made from reinforced ABS plastic and have a rubber surface coating to improve grip. ABS offers good mechanical strength, although it can wear with heavy use; it does not match the longevity of original Sony sticks.
What tools or steps are needed to install a stick from this kit correctly?
Installation requires a #00 precision Phillips screwdriver, fine tweezers and a light clean of the contacts before assembly. The process involves opening the casing, removing the damaged stick and fitting the new one while securing the connectors, which typically takes 10–20 minutes.
Kundenbewertung schreiben
Kunden, die diesen Artikel gekauft haben, kauften auch


Ihre zuletzt angesehenen Artikel